E12 | Ridgewood Colonial Revival | Walled in Science
Season 46 Episode 12 | 23m 42sVideo has Closed Captions
Building science expert Christine Williamson teaches Kevin about vapor and condensation.
Kevin O'Connor meets Zack Dettmore upstairs in the new primary bedroom where Zack is working to create a vent that will blend into the wall to keep the modern look. Meanwhile, Jenn Nawada and homeowner Peter tour the James Rose Center with director Dean Cardasis. Later, building science expert Christine Williamson gives Kevin a lesson on fighting water vapor and keeping walls dry year-round.
Funding for THIS OLD HOUSE is provided by The Home Depot and Renewal By Andersen.
Support provided by:


E12 | Ridgewood Colonial Revival | Walled in Science
Season 46 Episode 12 | 23m 42sVideo has Closed Captions
Kevin O'Connor meets Zack Dettmore upstairs in the new primary bedroom where Zack is working to create a vent that will blend into the wall to keep the modern look. Meanwhile, Jenn Nawada and homeowner Peter tour the James Rose Center with director Dean Cardasis. Later, building science expert Christine Williamson gives Kevin a lesson on fighting water vapor and keeping walls dry year-round.
How to Watch This Old House
This Old House is available to stream on pbs.org and the free PBS App, available on iPhone, Apple TV, Android TV, Android smartphones, Amazon Fire TV, Amazon Fire Tablet, Roku, Samsung Smart TV, and Vizio.
Keep Exploring


This Old House Insider Newsletter
Get This Old House exclusive stories, tips, and behind-the-scenes information delivered right to your inbox every month.Providing Support for PBS.org
Learn Moreabout PBS online sponsorshipKevin: Today, we're going to learn about a magic membrane that helps us protect the interior of our wall.
Jenn: And I'm visiting the James Rose Center right here in Ridgewood to get inspiration for our project.
Zack: And we're going to prefabricate a set of stairs start to finish right here at the jobsite.
Kevin: So nose forward, pockets underneath.
Right?
Zack: Correct.
♪♪ Man: Ahh.
That's it.
♪♪ ♪♪ ♪♪ ♪♪ Kevin: Hey there.
I'm Kevin O'Connor, and welcome back to "This Old House" and to our project here in Ridgewood, New Jersey.
We've got ourselves a 1930s colonial revival with some changes here out front.
The original shingles have been pulled off, and you can see that we've got our adhered membrane out there to protect against water and air infiltration.
All of the original windows have been pulled out, and even though the openings are the same size, we've got new casement windows that have gone in.
So when this gets put back together, instead of shingles, we are going to have clapboard.
But other than that, pretty much everything out front stays the same.
The big changes outside, however, are all out back.
So as I said, big changes out back.
It's this two-story addition on a new foundation.
So we've got about 600 square feet of new space downstairs for the kitchen, upstairs for a new bedroom.
And this, because it's the addition, we want to make it look different and a little bit more modern.
So check out the glass coming to the corner right there.
And we're going to put shingles on this building right here.
And then over on the main house, original house that you can see wrapped in the blue, that's going to match out front.
So that's going to get clapboards.
Again, the old windows were taken out, same-size openings replaced with casements right here.
So we're trying to make the two massings right here look a little different from each other.
Let me give you a tour of the inside.
The family is going to most likely enter the house off of the driveway when the scaffolding is not there, through this door into the addition.
And as I said, first floor down here is a kitchen.
Hey, Bill.
And here you really get the effect of this glass, the modern look -- nice, crisp and clean, but it also directs your focus to the private part of the yard as well as the patio area.
So kitchen layout in here.
And then as you back up you come to where the addition ends and the old house, it starts right here up a couple of stairs into the new space.
We've got a pantry tucked in there -- that is new -- and then we've got ourselves a full bath tucked in over here.
And this replaces an old half bath, which, if you remember, was this really small space just off of the hallway.
That has changed and become this.
Then right here where you see the floor -- hey, Kalen.
Kalen: What's going on, Kev?
Kevin: You got the old floor right here.
This part of the house pretty much stays unchanged.
Obviously, plaster came down so we can insulate, put rough-in, otherwise unchanged, except for this.
The stairs used to go right up here.
Now it's a coat closet, because the entrance to the second floor is right here on the staircase.
Like the first floor, the layout here on the second floor in the front of the house stays pretty much the same.
So three bedrooms behind me.
And then the original bathroom also is going to stay the same.
You'll enter it off of this center area right here, but it changes because we made it bigger and gave it a second entrance off of the primary bedroom.
So now this is all the new additions, big vaulted ceilings and our GC.
Zack, how are you?
Zack: Hey, Kevin, how's it going?
Kevin: Going alright.
It's hot.
But other than that going well.
Zack: It's a little toasty up here.
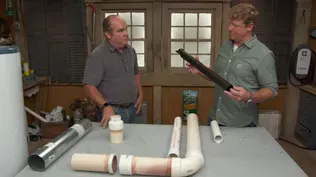
Kevin: You working on our HVAC?
Zack: Yes.
What we're gonna do is a little custom carpentry project for the outlet of this HVAC system.
Kevin: Alright, so, the house had steam and only steam.
We got rid of that.
And now we're getting hot and cold air?
Zack: Yeah.
And Richard's recommendation, we're doing this high-velocity system, and it's basically heating and cooling is going to be provided to this room through these four attenuators.
And normally you would have an outlet that sort of looks like this.
Or they have really nice slotted ones.
But we thought having four of them would make that wall look sort of visually complex.
And because the homeowner wants sort of a modern, minimalist design in this part of the house.
Kevin: So what's your option?
Zack: So what we're actually going to do is make one slot, and we're going to make that slot in a piece of this plywood here.
And what that's actually going to do is just make it really minimalist.
So it'll just be a 3/4-inch slot that runs 7 feet, and the attenuators will be brought into boxes which feed that slot back.
Kevin: Beautiful.
Zack: And then we'll assemble it into a box that will be lined with foil on the inside.
Alright.
Just to seal the end of this end grain, let's put some tape in there, even though the attenuators probably will cover most of that.
It can't hurt to have it sealed up.
Alright.
We got these takeoffs provided by the HVAC contractor, and we're just going to screw them to.
It's got this big thick gasket which will compress to make it air-tight.
And we'll screw them on the back of these boxes we made.
Man: Perfect.
Man: Get another hit.
Hold it.
Zack: Yep.
Man: One more.
Alright.
Go to the next one.
Zack: Yep.
Man: About in the middle.
Push.
Mm-hmm.
Zack: Keep that nozzle nice and close.
If I'm looking up at this angle, I can still see some reflection.
See that?
Man: Yeah.
Zack: Try and get into those corners.
Oh, yeah.
That's the spot.
Man: That's pretty good.
Yeah, yeah, that looks good.
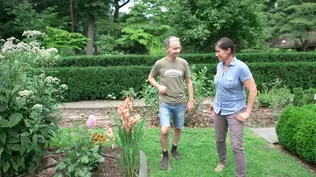
♪♪ Jenn: While work continues at the house, Peter and I are headed to a nearby community center that was once the home of landscape architect James Rose.
He was one of the leaders of the modern movement in American landscape architecture.
We hope to get some inspiration for Peter and Kay's garden design.
So we're meeting with Dean Cardasis, a renowned scholar of James Rose's work.
Peter: Dean, this is Jenn.
Dean: Jenn, great to meet you.
Jenn: Great to meet you as well.
Can't wait to learn about this place.
Dean: Well, welcome to the James Rose Center.
Happy to have you here.
Perhaps this episode should be called "This Old House and Garden."
Jenn: I like it.
Dean: Because here what Rose tried to do was to create a unified design between architecture and landscape.
In fact, he described it as neither landscape nor architecture, but both.
Neither indoors nor outdoors, but both.
And if you want to come inside, I can show you a little bit more about what I mean.
Jenn: Great.
Let's go.
Dean: Alright.
So, Rose, being a good modern designer, took advantage of Wright's ideas of the open plan.
And as you can see, he opened up a small galley kitchen over there to the large living space that we have right here.
But Rose took it one step further and opened that up to the landscape, which was equally designed right here.
Peter: And, Jenn, that's one of the things that I wanted to show you here that I thought was so exciting was I loved how the shoji screen ideal gives you the vignette peek at the garden here, and I thought we could do something similar in my office, where it's built-in bookshelves on either side, but we could still get that vignette view of the garden and kind of mimic what's here.
Jenn: I think it's a great idea.
Dean: He tried everything he could to get more space out of his tiny lot, and he eventually decided he would build a roof garden up here.
I particularly enjoy this space up here that Rose made, because to me, it's the most ambiguous one about whether we're indoors or out.
And what Rose did here was he created this beautiful filigree and then ultimately sheathed it with nothing, making it transparent, or with this translucent fabric, or sometimes an opaque material.
That's what creates this ambiguity about whether we're indoors or out, and about what the relationship is between me and what's beyond.
Jenn: Yeah, absolutely.
Dean: You know, Rose was so interested in space that he didn't feel any compunction about designing all of the things which design space.
He once said, "I find it helpful to think of a garden as sculpture, not sculpture like an ordinary object that you view, but sculpture that's large enough and perforated enough to walk through and broken enough to guide the experience, which is essentially a communion with the sky."
Jenn: And he has a fantastic use of materials.
So I have a question.
Can anyone come visit the James Rose Center?
Dean: Yes, indeed.
And I wish anyone would come and visit because it's a very special place.
Jenn: Well, we certainly are inspired.
Dean: Great to meet you.
Jenn: Thank you for the tour.
Dean: Thank you for coming.
Peter: Thank you so much.
Dean: Good to see you again, Peter.
Take care.
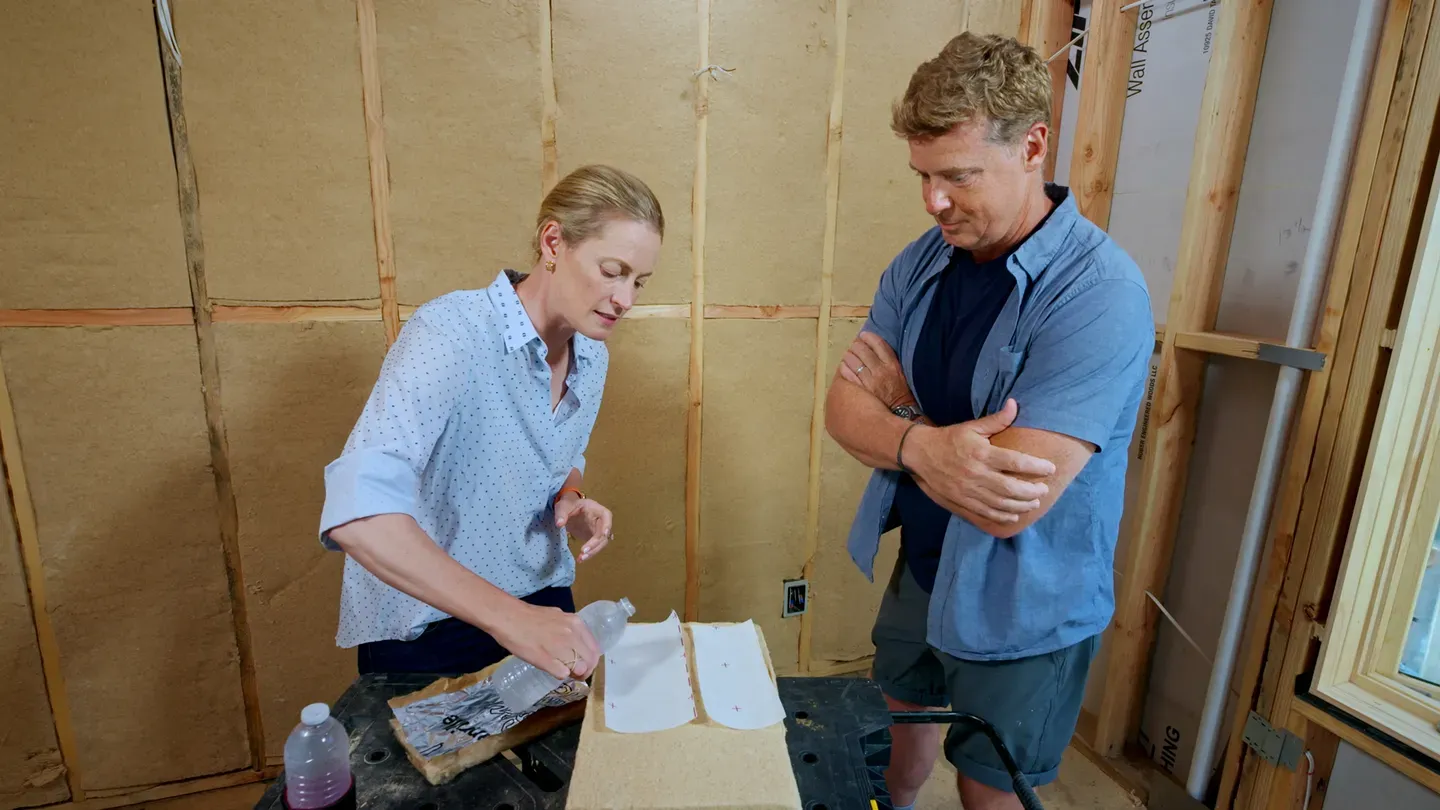
♪♪ Kevin: Water is the enemy of a house, and we do everything we can to protect it, which is one of the reasons why we've got a membrane on the outside.
But we're also going to put a membrane on the inside wall of this house to control vapor.
And that's a little bit harder to understand and get our head around.
So it's always good to have a professor and expert of building science to help us think it through.
Hey, Christine.
Christine: Hey, Kevin.
Kevin: Good to see you again.
Christine: Good to see you.
Kevin: I am glad you're here to help us figure out how to properly detail our wall.
Christine: Water is a big enemy for us when we're talking about the durability of our walls.
And the number-one thing we think about when detailing walls is how to deal with rainwater.
We're kind of obsessed with rainwater.
We've got all this stuff, we've got clapboards, we've got overhangs, we've got siding.
We've got all kinds of membranes to deal with keeping bulk water out.
Kevin: Yeah, when I pulled up, we've got a blue membrane on the front of the house, but it's everywhere.
It's part of that controlling rainwater.
Christine: Exactly.
But that is actually not the only kind of water that we're worried about.
How much of your high school physics or middle school chemistry do you remember?
Kevin: Ehhhh.
Christine: Ehh.
You'll remember this.
You'll remember this.
Water actually comes in three phases.
Kevin: Oh, yeah.
Sure.
Christine: So we've got liquid water, like rain, that we worry about.
We've got ice -- solid -- and then we've got gas -- we've got water vapor.
Kevin: Sure.
Christine: We've got all kinds of materials that can help us with bulk water.
Like, um, you know, all these kinds of membranes.
We're not using this one in the outside of the house, but the concept is the same.
So this will stop liquid water, but it's woven in such a way that it allows water vapor to go through.
Kevin: So let's talk about vapor because that was actually driven into me by our guys about vapor control when we're insulating a wall.
You know, they said pick a side and they say pick the warm side.
Christine: Pick the warm side.
Kevin: It's cold out there.
It's warm in here because a shower is breathing and all that kind of stuff.
So when we put up like fiberglass insulation, this facing -- this is actually a vapor barrier.
So they tell us put it this way because this is where the warm air is and that's got the vapor.
And if you stop it here, you stop the condensation in the wall.
Christine: Exactly.
And what we want to do is keep the moisture, especially wintertime -- This is a wintertime issue we're most concerned with -- keep all that moisture in the winter from cooking, cleaning, breathing, showering, keep that out of our wall.
Keep it on the -- on the inside of our enclosures.
What we really want to make sure it doesn't do is waft all the way through and hit the back side of the sheathing here, where it can bead up just like it does on a glass of soda or water on a hot day.
Kevin: The condensation gets us back to bulk water that can cause the rot, the mold and stuff like that.
Christine: Exactly.
Exactly.
So we want to keep all that moisture on the inside.
And what we use is a membrane in order to do that.
But we have had some major changes in the way we condition our buildings.
Kevin: Hmm.
Right.
So winter, cold, hot in here.
But now we kind of flip it in the summer because we add so much air conditioning, tons of air conditioning dumped into the house.
Christine: Literal tons of air conditioning.
Kevin: So now this is kind of like the winter side and that's kind of like the inside.
Christine: Exactly.
Kevin: So we basically have the -- In that situation, this is now on the wrong side of the wall.
Christine: Exactly.
And we'll get condensation on the back side of that.
Too much moisture in the wall.
And we can rot our wall in the summertime.
Kevin: What do you got for us to help us solve that?
Christine: Well, what we've got are smart membranes that we can install.
If you look at this material, it's woven and it's -- if you put it under a microscope, you would see some incredible chemistry and physics at play.
And without getting too crazy into the details, if you picture this material like a sieve -- like draining pasta or something like that... Kevin: Right.
Christine: Water comes in different sizes, so if you've got a whole lot of clumps of molecules stuck together, like basketball-size molecules, that'll be like bulk water, like the rain water we talked about.
Kevin: Liquid water basically.
Christine: Exactly.
Kevin: Big.
Christine: Big.
But water vapor is a lot smaller, like the size of a ball bearing maybe.
And so we've got all kinds of materials that are woven in such a way that they allow different sizes of molecules through.
So you'll notice over here this water is still beading up.
You're going to see it's going to be still dry underneath it if I don't spill it.
[ Laughs ] Kevin: Right.
Yeah.
Christine: But water vapor compacts.
Kevin: That's because -- Right.
So the mesh or the sieve you're talking about is tight enough that the bulk water doesn't get through?
Christine: Exactly.
But water vapor will.
Kevin: Okay.
Christine: But what makes this so smart is that it allows water vapor to pass through it in certain conditions and restricts it in other conditions.
Kevin: Really?
Christine: Well, the wintertime condition we were talking about, when we're generating a lot of moisture on the inside, the relative humidity in wintertime is relatively low.
And this works as a fantastic vapor control membrane in the wintertime when relative humidity is low.
When relative humidity is higher, in the summertime, it opens up and allows more of those ball-bearing-size molecules of water through and allows drying to the interior.
Kevin: So if the wall interior were to get wet for some reason in the summer, whereas this normally would be, you know, a barrier, you're saying that that moisture in the wall could dry into here.
Christine: Passes right on through.
Kevin: It allows it?
Christine: Exactly.
Kevin: And that helps this dry?
Christine: Exactly.
Kevin: Hoo, baby!
Alright.
Christine: So we've designed a wall that will dry in both directions.
And we get restriction when we need it and drying when we need it to.
Kevin: Awesome.
I love it.
And I did get through middle school.
Thank you, Christine.
Christine: Thanks, Kevin.
Kevin: Great to see you again.
♪♪ Zack, you got the right person working on your wall assembly there.
Christine is "smaht."
So, um, you told me to show up to help you with stairs.
Zack: Yeah.
So basically, we created this new hallway, but the addition is a different elevation than the original house, so we've got three steps down and we put this temporary step in.
But we're at the point of the job where we want to put the final version in.
Kevin: Okay.
So we've got three treads here, then a final tread up there.
Four and four risers as well.
Zack: Right.
So basically we frame this such that our staircase will finish inside of this.
And then we'll return the trim into the opening.
And what we're going to do is do something called housed stringer staircase.
It's what the house had originally.
But basically instead of sort of cutting stringers and then applying subfloor to do them and sort of working in place here, we're going to build everything on the workbench, and I find it to be an easier stair to execute and less likely to squeak.
Kevin: And if I understand housed staircases, the materials you're using to build are also your finished materials, so you're not applying a finished skirt to rough framing or anything like that.
The thing you build it out of is also your finished?
Zack: Exactly.
So we will have to come over once we're done and protect this because it's our finished floor surface.
Kevin: Alright.
We're working back here?
Zack: Yeah.
Let's do it.
Kalen's setting it up.
Kevin: Kalen, how are ya?
Kalen: Doing pretty good, Kevin.
How are you?
Kevin: Alright.
Thank you.
Zack: Alright, so here's the parts of our staircase.
We've got the stringer, which is the side portion that's supporting the weight of the stairs.
That's five-quarter poplar.
Then for our tread, we're using red oak solid tread.
That's what you're stepping on.
And the riser, the part you kick on the way up, that's primed pine, so it's easier to paint.
Kevin: Basically -- Okay, let me see the layout.
Zack: Yeah.
So we're gonna lay it out like this.
We already have our rise and our run calculated with this framing square.
Kevin: Those will go basically like that.
Zack: Right.
And Kalen made this awesome template because we're actually going to route out a channel that these will sit in.
And that's how the staircase is supported.
And it's monolithic and... Kevin: Hence the name housed stair.
Zack: Exactly.
And you'll notice that the template is actually bigger than the piece.
And that's for two reasons.
One is because if you had dozens of these to install on a large flight of stairs and you were trying to fit this in the exact slot, you would really be struggling.
So it's better to have that little bit of slop, and then you just take a wedge and put it in.
The other reason is if this was cupped, this wood, because it's a natural product, you'd be able to take that cupping out of it and really have it embedded nice and tight on the top.
Why don't you do this with Kalen?
I'll start pocket-holing the treads and risers.
Kevin: Roger that.
Okay.
Thank you.
Kalen: You see, Kevin, I got a pattern bit here that we're using on this jig.
And this has got a top bearing on it.
So it's gonna allow us to follow this exact line that I made out of my template and translate that all the way to our cut-in material.
[ Tools whirring, buzzing ] The plunge router I'm using allows me to make a series of shallow cuts into the stringer material, which puts less stress on the bit and makes for a cleaner finished cut.
[ Tools whirring, buzzing ] [ Whirring, buzzing continue ] Alright, Kevin, we can take this off.
We still got a couple of cuts to make, but we should route the other one, and then we can get back to it.
Kevin: Get this out of here.
Kalen: Alright, then we can put the landing tread at the top, and then we can mark off where that is.
So we know where a plumb cut is going to stay.
Kevin: So this one's shorter than the other treads.
Kalen: Yes.
And it's going to be also a little shallower so we can set it on top of this floor.
Kevin: Like the front there?
Kalen: Yeah.
Nice and tight.
Go ahead and give it a mark.
Kevin: So no shim on this one?
This one just sits on the floor?
Kalen: Yeah.
These will just -- This will sit on the floor, and then, you know, all get screwed together.
No shims.
And then we have a dado here.
And that's going to receive because we have three-quarter floor material, it's got to match with the nosing since our nosing is one-inch thick.
Kevin: So that's going to slip right in there, tongue and groove almost.
And same idea with this?
Kalen: Yep.
We'll have a little bit longer of a riser so that it can tuck up into that dado to compensate for it.
Kevin: Mark the back of that.
Alright.
So that goes away too?
Kalen: Yep.
[ Saw buzzing ] Zack: Alright.
Let's put the treads in first and we'll put a little bit of construction adhesive in these joints first.
Kevin: Okay.
Good.
Zack: A little bit in there for the wedge.
Kevin: Good?
Zack: That looks great.
Kevin: I love the wedge.
Zack: Go in there.
[ Tool whirs ] Let's put the glue on.
We'll pop it on top.
Alright.
You start on your end, and then I'll gently let mine down as we go.
I'm looking good over here.
How's it look on that side?
Kevin: Nice.
It's moving.
Zack: More?
Kevin: No.
You're good.
Zack: Squeeze out.
Kevin: That's just telling me it's nice and tight.
Zack: Okay.
A couple of screws in her.
Kevin: Yep.
Perfect.
Zack: We're also going to do a bead on the back.
[ Tools whirring ] So, this block is going to do a really good job with all this glue of tying these two together.
And because this is where your foot is typically landing on the step, I want that connection to be very strong.
Kevin: Why don't you head in first there?
Perfect.
Alright.
Pretty good there.
Come up a bit.
Alright.
You got it?
Coming in.
Look at that.
Come around and admire that.
Zack: That's perfect.
Kevin: Looks good.
Finished.
Just sets right in.
Nice system, boys.
I like it.
Alright, so, Zack, what do we got coming up next time?
Zack: Next time, we'll be wrapping up the siding on the outside, and we'll be prepping the interior, doing soundproofing to get it ready for drywall.
Kevin: Alright.
Like to hear.
We got all that coming up next time.
So until then, I'm Kevin O'Connor.
Kalen: I'm Kalen Gomez.
Zack: And I'm Zack Dettmore.
Kevin: For "This Old House" here in Ridgewood, New Jersey.
You guys want to finish that off?
Zack: Yeah.
Kalen: Let's do it.
Zack: Let's center it up.
It looks like it needs to go a little bit that way.
♪♪ Kevin: Next time on "This Old House"... Zack: We're installing the siding that looks just like real wood.
And what do you think?
Does it fool the eye?
Kevin: The grain looks right.
The color looks right.
How'd they pull that little magic trick off?
Zack: And I'm touring this factory where they're brewing up a new type of insulation.
Kevin: And we're going to paint our PVC trim a dark color.
So we're going to learn how to prep it properly and pick the perfect paint.
That's next time.


Funding for THIS OLD HOUSE is provided by The Home Depot and Renewal By Andersen.